How to Use SOEP IGEL
IGEL Workstation
IGEL refers to a computer terminal workstation for access to SOEP data:
The terminal allows data to be entered and displayed.
The IGEL is a so-called thin client, a computer with little computing power, which only provides a terminal to a server.
This thin client at the SOEP guest workstation/FDZ is from the manufacturer Igel Technology, where IGEL stands for “I ntelligente G esamtlösung in der Mikro el ektronik”.
Account
Access to SOEP data can only be provided in compliance with high security standards to protect respondents’ confidentiality and maintain their trust in the survey. The data are also provided solely for scientific research purposes, that is, they are only made available to members of the scientific community. Researchers can therefore only access SOEP data after they have signed a data distribution contract with DIW Berlin. The same rules apply to the secure guest workstations at RDC SOEP and at other secure data access points. Since IGEL terminals also provide access to small-scale regional data, users have to sign additional contracts for these data.
All IGEL users must sign a data distribution contract with the DIW Berlin: Application for a Data Distribution Contract.
Logging in
Turn on the computer and the following screen should appear on the monitor. (see figure 1)

Figure 1: IGEL start screen
At the bottom right, you should see the icon for an existing network connection appear: Two arrows, one pointing up and one pointing down.
Click on the arrow icon to see the terminal name and the existing network connection . See figure 2.
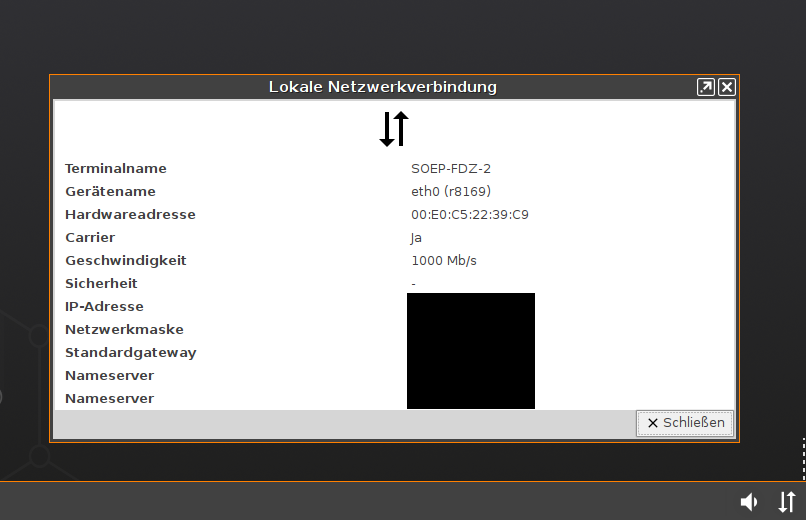
Figure 2: Connection with LAN available
For each available server, two icons are displayed on the start screen at the top left, a red one and a blue one with the same name. See figure 3.
The following two servers are currently available:
HAUSER: Access to the SOEP survey data, including connection to small-scale regional and establishment indicators (WITHOUT coordinates).
MORAN: Access to the coordinates of SOEP households, but without survey data.
Access is only possible from RDC SOEP guest stations at DIW Berlin
Figure 3: Icons to connect with the SOEP server
Blue Icon: To connect to one of the two servers at RDC SOEP, first establish an open VPN connection by clicking on the blue icon for the server you would like to connect to. The icon in the lower right corner should then display the existing VPN connection. By clicking once on this icon, you can see the server’s IP address . See figure 4
Red Icon: Once you have established the VPN connection to the SOEP server, click once on the red icon to start your session. The server’s login window should appear, see figure 5. Enter the user name and password provided to you by RDC SOEP.

Figure 4: Open VPN connection established
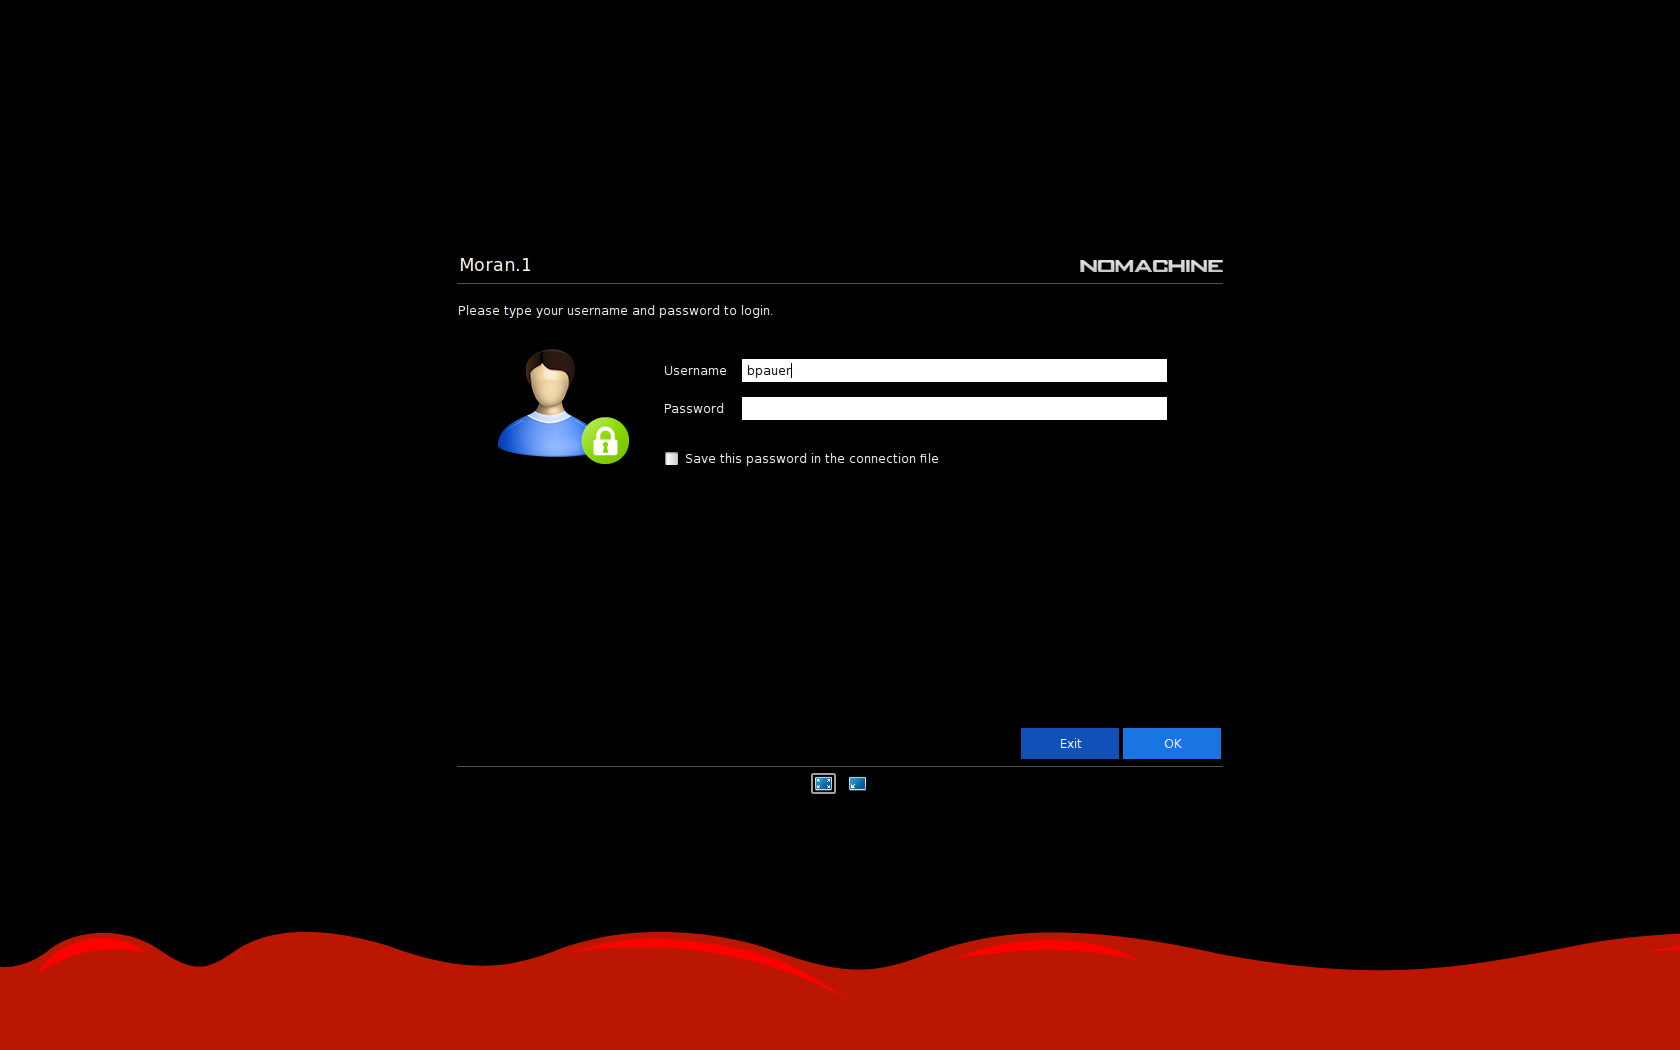
Figure 5: Login to the SOEP Server
Working with SOEP DATA
Starting programs
After you have logged in, a blank desktop will appear with a menu bar at the top.
In general, programs can be started by clicking on “activities” and then either by clicking on the icon or by typing the name of the program into the search field.
Users should inform the RDC SOEP team in advance about any additional ados in Stata or packages in R. These will be installed after checking.
Start Stata: Unfortunately, there is no automatic start icon for Stata, so you have to do the following:
Click on activities
Enter “terminal” in the search window
Start either “Terminal” or “XTerm”.
Enter the command “xstata-mp” into the terminal that has now appeared, and press the return key. Stata should now appear.
The following table shows which programs are installed and available for use on each server:
Running time-consuming computing operation
If a script needs more than one hour for calculation, the script should be run in the background. For long running scripts in R or Stata you should not use xstata or Rstudio.
Executing your script
The R-script should be executed with the “Rscript” command in the terminal.
The STATA do-file should be executed with the “stata-mp do” command in the terminal.
What should be used?
Yo can start a session in tmux or you can use the command nohup. We suggest to use tmux.
How to start your script?
Open a terminal and change to the folder where the script is located with the command cd. Now you can execute your script using tmux as follows:
Start a tmux session and assign a name (*myname*) with the command
tmux new -s myname. If later you forget the name, use the command:tmux list-sessionExecute your script: In R (*yourscript.R*) / in STATA (*yourdofile.do*)
When logging in again, all running sessions can be listed with
tmux list-sessionThis session (*myname*) could be restored after the terminal was closed with
tmux attach-session -t mynameWhen your script is finished, please start your tmux session again with
tmux attach-session -t mynameand close your running session withexit
Program |
HAUSER |
MORAN |
|---|---|---|
Stata |
Yes |
-/- |
R/RStudio |
Yes |
Yes |
QGIS |
-/- |
Yes |
grass |
-/- |
Yes |
PostGis |
-/- |
Yes |
LibreOffice |
Yes |
Yes |
Emacs |
Yes |
Yes |
gnome-text-editor |
Yes |
Yes |
Nautilus (File manager) |
Yes |
Yes |
Using SOEP data and your own data
The latest version of the SOEP data is available at the following address directory path:
- HAUSER
~/soep-data/or/import/SOEP-Regio/data/- MORAN
~/soep-data/or/import/SOEP-GIS/data
You can store your own data and scripts in your personal home directory.
~/work/
Logging out
Use the icon in the upper right corner

click on your username and on logout.
Importing Scripts or External Data
You can send these data to the RDC team before your stay. Send it to SOEP. Please use the following website: cs-soep.diw.de
Before you send us your files (only data files, text files and tables), please put all files into a zip archive and name it as user-YYYY-MM-DD.zip (mustermann-2020-12-24). Please do not send ados, binaries or r packages in the zip file, ados or r packages will be installed centrally by the SOEP team.
As receiver for the data and scripts please use soepmail@diw.de.
Before you come to us, please send us the data to import early (2 days in advance) enough so that we have enough time to install it.
You will be able to find and use yout imported data here:
/home/USER/transfer/import/You can read, write and save in your personal directory:
/home/USER/work/
Attention
Because disk space is limited, we had to introduce the concept of quotas:
each user gets 10 GB of disk space
to display there is the quota command
the data remains on the server until the end of the project duration.
after the end of the project, the data is taken from the server and archived for 10 years.
it is possible to upload the data to the server again later with sufficient preparation time
Instructions for exporting from Hauser to user
From a secure guest workstation at the SOEP Research Data Center, users can analyze SOEP data in combination with small-scale regional and establishment data. However, to provide users with this sensitive information, we have to carry out additional protective measures of both a technical and organizational nature. At a guest workstation at the SOEP Research Data Center, you work on a thin client from which you cannot export any data on your own. Below we describe how you can obtain the results of your analyses after they have been checked for anonymity.
How can I take my results with me?
In your transfer folder, you will find an import folder (containing your external data that have been imported into the system) and an export folder.
1. Create on the server ‘Hauser’ below directory ‘~/transfer/export/’ a new subdirectory with a name as the current date in ISO-format:
mkdir /home/USER/transfer/export/yyyy-mm-dd
Eg.: You are user Jane Doe on the server ‘Hauser’ and today is February 29, 2021
jdoe@Hauser mkdir /home/jdoe/transfer/export/2021-02-29
We know there wasn’t a February 29th in 2021, but that’s just a format example
2. This folder should contain the following
The results that you definitely need to take with you (for formal criteria, see below)
A README file (as a .txt file, Word file, or Libre Office file) in which you briefly describe each file in the export folder
Please make sure that the README file is readable and that line breaks are used
3. Check your files
Before you make a request for an export please check your data structure with the
OutputControlcommand.Execute this command in the export folder you want to export.
This command is used to check whether the formal requirements of the files are met (more information in the chapter “Formal criteria for exporting files”).
Change to the folder you want to export
cd /home/USER/transfer/export/yyyy-mm-dd
In the Terminal, enter the following command: OutputControl
Check the Control_output_USER_yyyy_mm_dd.txt output in the folder Control in your export folder.
If you want to make a request for an export, the control file should not contain any warnings.
If you have any questions, please contact the SOEP hotline.
4. When your folder is complete, please send an e-mail to soepmail@diw.de with your export request
Before you submit an export request, please check that your export is complete and ensure that the following criteria have been met:
Attention
Please read the following rules carefully. If you break the rules, you will not receive your export files.
Formal criteria for exporting files:
Microdata sets at household, personal or establishment level will NOT be exported.
Only the outputs of analysis (tables, figures), syntax files, and log files will be exported:
- Tables:
must be stored in the file format .csv
the maximum number of text files and tables is 200
- Figures:
must be saved in one of the following file formats: .png, .svg, .jpg, .tiff, .eps, .pdf
- Text files (scripts or log files):
must be stored in one of the following file formats: .txt, .tex, .do, .r, .pdf, .log, .md
may have a maximum of 25,000 lines (a command to count these from a terminal for all .log files in a directory is wc -l *.log)
- the maximum number of text files and tables is 200
Please make sure that the files are readable and that line breaks are used
Please note that no special characters or spaces are used in file names. Please check if the files are really readable after creating.
An export request can only be made once a week
Criteria for exporting results:
In principle, the results cannot allow any conclusions to be drawn as to which spatial planning region, smaller-scale geographic unit or establishment a household or individual was or is part of.
No regional (e.g., municipality code, district code, zip code …) or establishment-level information (e.g., turnover, employee number …) may be listed (e.g., using the list command in Stata) together with identifiers (e.g., individual ID number, household ID number, establishment ID number)
If establishment data (employer data; e.g., from lee* datasets) are used in the analysis, this must be reported to the SOEP hotline.
When creating tables and figures: - the minimum cell population must be kept at 10 if region-specific characteristics are used - the minimum cell population must be kept at 5 if establishment-specific characteristics are used
Additional notes on export:
Since the export has to be checked manually, checking can take up to two or more weeks, of course depending on the number of files to be checked.
The export link sent to you will only be available for a specified period of time (at least two weeks).
To open the export link, use your guest access password.
Data transfer from Moran to Hauser
From the three servers of “SOEPgeo”, or the SOEP Research Data Center’s guest network, SOEP users can analyze geocoded data for scientific purposes on site at the SOEP Research Data Center. Researchers are first required to sign a data protection agreement, and a complete record is kept of all data access. The concept is to keep the geo-coordinates of SOEP households separate from the actual survey information throughout the entire process of analysis by data users. Only the coordinates and the survey year are needed generate topic-related indicators in a geographic information system (GIS; grass, qgis, and postgis are installed on Moran) or in the statistical package R, and no further information on either the household, household members or the establishment. SOEP Research Data Center staff transfer indicators generated by users in a GIS. This prevents any possibility of users accessing the data. The key component of the data protection concept is that SOEP households geo-coordinates are kept separate from the survey information:
At no time do data users have simultaneous access to coordinates and survey data
Data users can only generate topic-related indicators on Moran, where the SOEP survey data are not accessible.
Data users can only analyze the topic-related indicators on Hauser, where the SOEP-household coordinates are not accessible.
Topic-related indicators that were generated based on household coordinates may only be analyzed on the Hauser server and may not be exported from there.
The data user therefore has no simultaneous access to the SOEP survey data and the geo-coordinates of SOEP households. The results (exported Hauser results) may only be published in completely anonymous form.
How do I initiate data transfer from Moran to Hauser?
Attention
Please read the following rules carefully. If you break the rules, the data transfer cannot be executed.
Steps to initiate data export by the SOEP Research Data Center:
Create a subdirectory in the export folder on Moran with the export date: mkdir /home/USER/transfer/export/yyyy-mm-dd
This folder should contain both the dataset to be exported and a corresponding README.csv:
dataset with generated indicators and ID (see below)
README.csv (see below)
Send an e-mail to soepmail@diw.de with the following information:
What input dataset was used for the coordinates? To ensure correct data transfer, we need to know what version of the data was used (e.g., v35)
What is the export file format? (.rds, .shp, .csv are permitted) (to save in dataframe in rds format please use
saveRDS())What are the unique identifiers for the dataset? (e.g., ID & syear)
Formal criteria for data transfer:
The following criteria apply to exports:
The README.csv is a two-column .csv table
$name: column containing the variable names of the indicators to be exported (e.g., distance)
$description: short description of the respective variable (e.g., distance in meters to the next flood point for household i in year t (for the flood in 2002))
The following applies to the dataset containing the indicators to be exported
Dataset must have the column/variable ID from the input dataset used
Permissible file formats: rds, shp, csv
Dataset otherwise only contains the indicators described in the README.csv file
Additional notes on data transfer:
After the data transfer has taken place, the output (datasets, transfer scripts) will be stored in your transfer folder on Hauser, in a subdirectory of your import folder that is identified by date (/home/USER/transfer/import/fromMoran/yyyy-mm-dd)
Section author: Jan Goebel <jgoebel@diw.de>
Last change: May 22, 2026